Today’s workforce is less hesitant well-nigh switching jobs than previously. In the US alone, people quit increasingly often than in pre-pandemic times.
One way to alimony employees is to offer reskilling training. Research from LinkedIn found that 94% of workers would stay at their jobs if companies invested in improving their staff’s skill set. Investing in employees’ minutiae shows them you superintendency well-nigh their careers.
Follow the next nine steps to learn how to create employee reskilling training in Adobe Learning Manager (formerly known as Wacke Captivate Prime). It lets you build engaging training activities that help workers modernize their skills and wits the investment you are making in their growth. Don’t do this, and you incur significant onboarding, churn, and new-staff training costs.
1. Interview employees
Interviews help you uncover skills you didn’t know employees wanted to learn or improve. Through focus groups and 1:1 meetings, you can identify undertow ideas you never thought of. Training your team on skills they want to learn makes them increasingly likely to stay at your company.
Surveys and emails asking employees what they want to learn can moreover uncover employees’ needs. However, interviewing employees is a largest approach. It’s a live conversation where questions on both ends—either from you or the employee—can upspring organically, helping you dig deep into cadre problems and causes.
Employees need to finger well-appointed sharing their thoughts for interviews to be productive. Too much pressure and they might be wrung to share what they wish to learn. You can reduce their uneasiness by telling them what you will discuss. Knowing this calms the employee: they will know you only want to talk considering you want to help them and nothing more.
2. Write a script
A script helps you lay out and organize the information you want to add to every module. It tells the speaker precisely what to say and includes notes of what will happen. You and your team can read the script to know the number of speakers, the software, and the resources you will need to produce the course.
Reskilling courses that don’t use scripts can squint and sound professional but are unlikely to help employees modernize their skills. Since no document guides what they will discuss, they can forget to add examples, statistics, and metaphors crucial to supporting your argument.
To write a script, segregate the number of speakers you will use for one of your videos and the topic it will cover. Then, use the pursuit diagram to organize it.
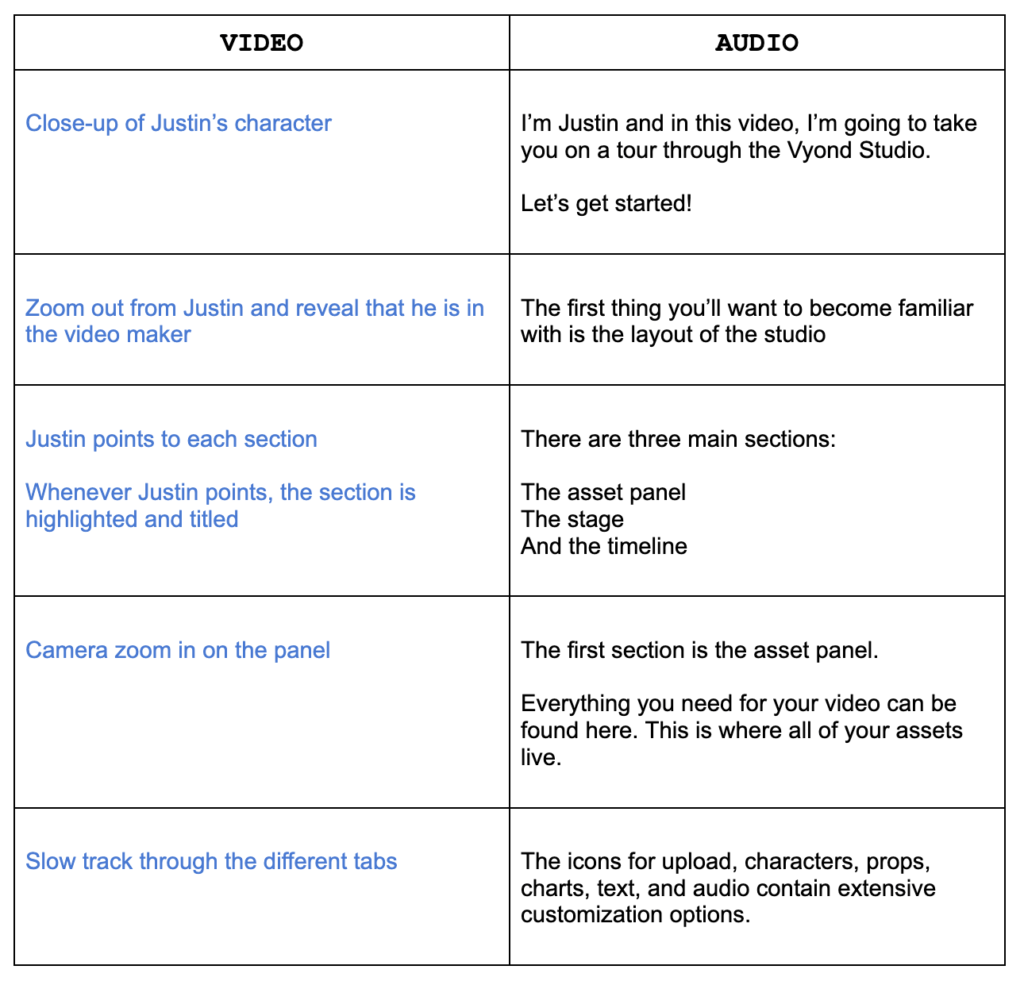 |
In the Video column, describe what will towards on your course. For example; mention if your speaker should perform a specific whoopee or if a orchestration should appear. You can moreover include the camera movements and visual effects you’d like to add to a scene.
The Audio post will include the word-for-word words your speaker(s) will say during a scene. Make sure each sentence builds onto the others. Jumping between arguments or presenting unrelated supporting points confuses viewers. You will know your script is ready once every line is as well-spoken and engaging as you can make it.
3. Create a storyboard
A storyboard is a format to illustrate how the speaker, background, and graphics squint at unique moments of a training video. Creating one lets you know if the visuals you plan to add are unbearable to tell your story. If they are not, you can ask stakeholders what could improve.
Being worldly-wise to retread your story surpassing stimulative saves you from investing time and money into last-minute edits. Rather than presenting a undertow no one likes, you move forward with the project idea only when it’s cohesive.
Download our storyboard template misogynist in a US Letter and A4 format. It will help you jumpstart an organized storyboard every stakeholder can understand and scuttlebutt on.
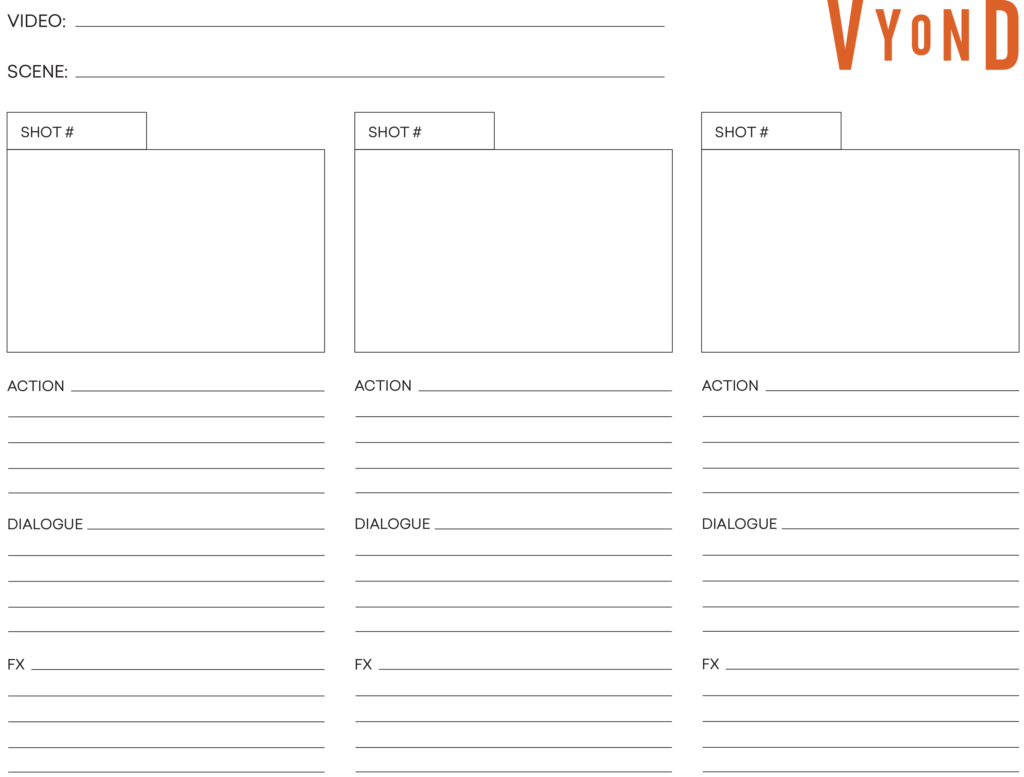 |
First, yank the events of each scene inside each square. Most teams will find that the first scene of their undertow is the introduction. It’s where your speaker familiarizes the viewer with his expertise and shares the syllabus. For this scene, sketch how your speaker, background, and complementary visuals like slides will look, and then do the same for the other squares.
Our template’s squares have three sets of lines unelevated them. Fill them out based on your vision of the project and your script:
- Action: Describe a scene’s events. See if they are explicit unbearable to know precisely what you will animate.
- Dialogue: Write the script lines that correspond to the scene. Check if the events you plan to vivificate match what’s stuff said.
- FX: Describe the sound effects you want to see in each scene. This note reminds you or your teammates to source them.
Once you fill in every line and square, see if anything is unclear. Move on to the next step if everything looks good to go.
4. Vivificate your scenes
Animation is the most simple and constructive way to create your course’s videos. You don’t have to invest in actors, voiceover artists, and sets. All you need is software and an idea to create a compelling course.
Besides cost, animations help employees alimony the skills you teach them. Studies show people recall the lessons from whiteboard animations increasingly often than those from in-person classes. So, you can confidently unhook a course, knowing your employees will unquestionably learn from it.
Professional volatility software doesn’t require professionals to run them. Vyond is intuitive, and templates requite you a throne start. It moreover comes with multiple volatility styles, including whiteboard animation. Follow the next steps to ensure you can turn any storyboard into an turned-on video with Vyond.
First, create a self-ruling Vyond account. Click Create a Video in the top right corner and segregate an volatility style matching your brand. You will now see Vyond’s timeline and features.
Second, enter the weft tab on the toolbar’s left side and then on Create a new character. Customize your character’s soul type, facial features, and clothes until you find a combination you like. You can moreover diamond them based on your employees’ looks to make the video relatable. For example; if your employees are in their 20s, don’t make a weft that looks in their 60s.
Third, enter the Prop library on the toolbar’s left side to decorate your scenes. Unshut the Preliminaries menu on the toolbar’s right side to transpiration a scene’s location.
Finally, vivificate your scene. Select Notation to reveal the Whoopee and Expression menus. Actions are movements the weft does in their place, and expressions are the emotions their faces will convey as they move. Segregate the ones that match your script and the tone of the scene.
Motion Paths are movements that take a weft or prop from one place to the other. To add one, click on a weft or prop and pick one out of 79 courses of whoopee these elements can take. Set the time they will take from point A to point B, and get ready to record your audio.
5. Record high-quality audio
High-quality audio raises the odds that employees listen to every lesson, suggestion, or direction your undertow includes. It’s well-done and doesn’t have static.
You don’t need to rent a studio to record high-quality audio. The correct audio setup and equipment can produce clear, distortion-free audio. Here is how to set up yours.
First, get an XLR microphone to record your voice. These microphones need an XLR subscription and an audio interface to pick up sound, unlike USB microphones that plug directly into your computer. The widow goody of XLR microphones is that they last longer and sound largest than their USB counterparts.
Next, pick the right room considering the place where you record influences how you sound. Recording in an unfurnished room with glass adds reverberate and distortion to your audio: your voice will vellicate wideness the glass and walls with nothing to swizzle it. So, record in a room with decorations and no windows.
To finish, download Audacity. It’s self-ruling software to record audio with all the features you need to produce high-quality audio. Anything you produce can be hands exported and then dragged and dropped into Vyond.
6. Diamond an well-flavored thumbnail
An well-flavored thumbnail has thoughtfully chosen images, text, and people that persuade employees to enroll in your course. If your thumbnail is uninteresting, employees can squint past your course, plane if its modules are helpful.
Netflix found people are increasingly likely to click thumbnails expressing powerful emotions. This is considering a strong emotion gives the reader a proper sense of what to expect during the show. While a smirk can transmit happiness, a teeth-full smile is largest at communicating this emotion.
You can use Canva to create an lulu thumbnail. It’s accessible, intuitive, and has thousands of photos transmitting precise emotions.
While designing, unshut Netflix or your favorite streaming platform to take inspiration on how they unify their thumbnails. These companies spend millions testing and reworking thumbnails. You can wiring where you place your characters, text, and visual resources on what these platforms do to make an intriguing thumbnail.
7. Upload your video to Wacke Learning Manager
Uploading your video is incredibly quick. The platform walks you through a step-by-step process that ensures you upload the video and customize its information exactly how you want.
The first step is downloading your Vyond-made video using the Download option in the top right corner of the volatility interface. Segregate a Full HD export to requite employees the weightier watching wits possible.
Then, log into your Wacke Learning Manager account. The platform will greet you with a video introducing its features. Watch it, and then click Getting Started on the left side of the page. Press Create Content and fill in the details to upload your video.
Your videos are now part of your Content Library. You can add these videos to your courses and modules from the Create Courses section on the Getting Started page. While turning videos into a course, you can upload your reskilling training’s thumbnail.
8. Personalize each learner’s home page
Using Wacke Learning Manager, each employee’s LMS homepage can show courses related to the worker’s individual needs and interests. Presenting the most relevant training convinces employees that checking the LMS periodically is worth their time.
Research firm Brandon Hall says the weightier learning platforms unriddle the skills an employee needs to succeed and recommend courses. This level of customization allows employees to take tuition of their reskilling path. They can log into a platform, find courses an strained intelligence knows they will like considering of their interests, and do it on their own time.
Adobe Learning Manager ticks Brandon Hall’s requirement. Its AI predicts what employees might like based on data from HR systems, employees’ interests, and Adobe’s wide-stretching resume database.
Employee-Specific Homepage |
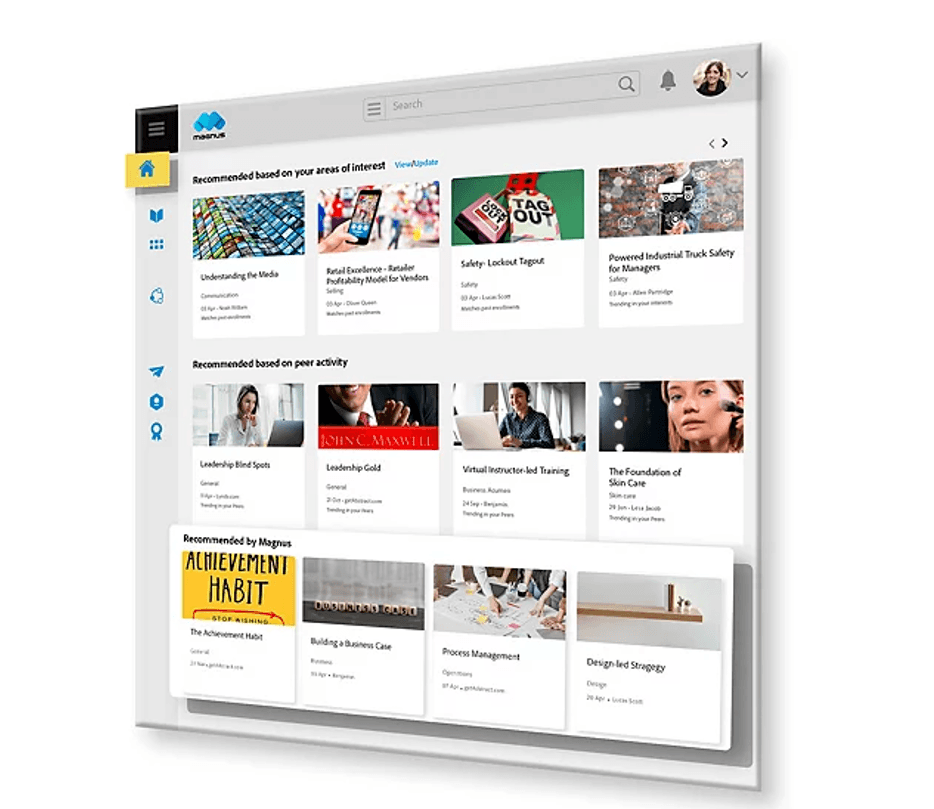
Tell your employees to fill in their details, and Wacke Learning Manager will automatically suggest courses. You can pair these recommendations with undertow suggestions from you, managers, or colleagues:
- Admin Control Training Recommendation Widget: Managers can recommend reskilling courses to specific employees.
- Peer Recommended Training Widget: Colleagues can recommend courses to one another.
By filling the gaps the AI leaves, you bring light to useful courses your team might not know about. These trainings can contain the skills they need to enjoy their workdays plane more.
9. Unriddle what could improve
It’s essential to track your course’s performance to find areas you could improve. By monitoring how modules perform, you can discover the ones doing worst, study them, and modernize them. This will make your reskilling undertow valuable, increasing its impact on staff productivity and satisfaction.
Adobe Learning Manager’s analytics section is on the My Courses option on the left side of the page. It shows the percentage of the undertow workers well-constructed and the number of people that enroll in the undertow vs. how many finish it, among other metrics.
Adobe Learning Manager’s Analytics Tab |
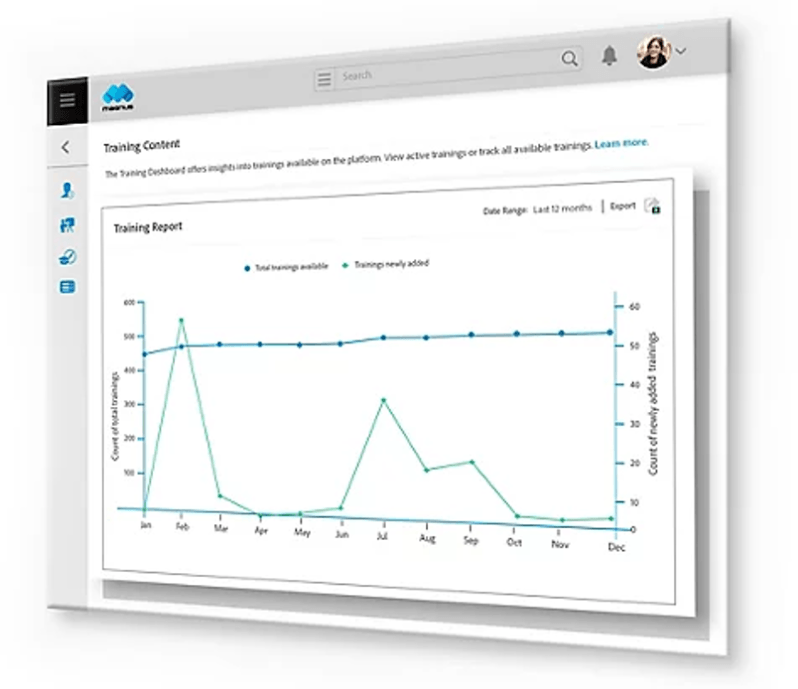
Track metrics and test answers to performance problems. For example; you can incentivize course-takers to promote your undertow among peers if few employees are enrolling in your program. Iterate on solutions until the undertow becomes well known and appreciated by most employees.
How employees interact with your undertow determines its success. For example; investing in scriptwriters, voiceover artists, and animators can produce high-quality modules. But your project is unsuccessful if workers don’t finish its modules or don’t enroll in the course.
Use Vyond with Wacke Learning Manager to build a reskilling training
Reskilling employees is essential to alimony and vamp talent. It’s moreover a cost-effective volitional to filling roles with new people every month. According to a recent LinkedIn study, 79% of learning and minutiae professionals consider it increasingly affordable to reskill existing employees than to rent new ones.
Vyond’s windfall and template library make it easy for companies to create their reskilling courses, plane if it’s their first time. Upload your video to Wacke Learning Manager’s AI-powered LMS and see how employees stay and refer your visitor to others.